1.准备 Babel 将 es6 转化成 es5 和解析 JSX 的工具(服务器端)
2.组件 1 var helloMessage = React.creatClass({render :function (return ···}})
组件类的第一个字母必须大写 ,否则会报错,应改为HelloMessage
1 var helloMessage = React.creatClass({render :function (return <h1 > </h1 > <p > </p >
组件类只能包含一个顶层标签,否则也会报错。h1 和 p 都是顶层标签了如果一定要含有两层或更多的话,记得用()括起来,return (
)
1 <HelloMessage name="John" class "错的" for ="错的" >
添加组件的时候 class 属性需要写成 className ,for 属性需要写成 htmlFor ,这是因为 class 和 for 是 JavaScript 的保留字
3.this.props.children –这个可以 push 到[]内,调用这个[]也可以 的值有三种可能:如果当前组件没有子节点,它就是 undefined ;如果有一个子节点,数据类型是 object ;如果有多个子节点,数据类型就是 array 。所以,处理 this.props.children 的时候要小心。React.Children.map 来遍历子节点,而不用担心 this.props.children 的数据类型是 undefined 还是 object。
1
2
3
4
5
6
7
8
9
10
11
12
13
14
15
16
17
18
19
var NotesList = React.createClass({ render: function ( return ( <ol> {React.Children.map(this .props.children, function (child ) return <li > {child}</li > })} </ol> ); }, }); ReactDOM.render( <NotesList> <span>hello</ span> <span>world</span> </ NotesList>, document .body );
4.PropTypes 1 2 3 propTypes: { title: React.PropTypes.string.isRequired, }
上边这句是设置 title 属性必须为字符串,且必须存在
1 2 3 4 5 getDefaultProps : function ( return { title : 'Hello World' }; },
设置属性默认值
5.获取真实的 DOM 节点 1 2 3 4 5 6 7 8 9 10 11 12 13 14 15 16 17 18 var MyComponent = React.createClass({ handleClick: function ( this .refs.myTextInput.focus(alert("haha" )); }, render: function ( return ( <div> <input type="text" ref="myTextInput" />{" " } <input type="button" value="Focus the text input" onClick={this .handleClick} /> </div> ); }, });
所有的 DOM 操作都在虚拟 DOM 上发生,然在在反应到真实的 DOM 上,叫 DOM diff。
6.this.state 1 2 3 4 5 6 7 8 9 10 11 12 13 14 15 16 17 18 var LikeButton = React.createClass({ getInitialState: function ( return { liked : false }; }, handleClick: function (event ) this .setState({ liked : !this .state.liked }); }, render: function ( var text = this .state.liked ? "like" : "haven't liked" ; return ( <p onClick={this .handleClick}> {" " } </p> ); }, });
this.props 表示那些一旦定义,就不再改变的特性,而 this.state 是会随着用户互动而产生变化的特性
7.表单 1 2 3 4 5 6 7 8 9 10 11 12 13 14 15 16 17 18 var Input = React.createClass({ getInitialState: function ( return { value : "Hello!" }; }, handleChange: function (event ) this .setState({ value : event.target.value }); }, render: function ( var value = this .state.value; return ( <div> <input type="text" value={value} onChange={this .handleChange} />{" " } <p>{value}</p> </ div> ); }, });
表单为变动的所以用 this.state 并且通过 event.target.value 读取用户输入的值
8.组件生命周期 1 2 3 4 5 6 7 8 9 10 11 12 13 14 15 16 17 18 19 20 21 22 23 24 25 26 27 28 29 var Hello = React.createClass({ getInitialState: function ( return { opacity: 1.0 , }; }, componentDidMount: function ( this .timer = setInterval( function ( var opacity = this .state.opacity; opacity -= 0.05 ; if (opacity < 0.1 ) { opacity = 1.0 ; } this .setState({ opacity: opacity, }); }.bind(this ), 100 ); }, render: function ( return ( <div style={{ opacity : this .state.opacity }}>Hello {this .props.name}</div> ); }, });
组件的生命周期分成三个状态:will 函数在进入状态之前调用 ,did 函数在进入状态之后调用 ,三种状态共计五种处理函数。
componentWillMount()getInitialState->componentWillMount->已经在页面显示出来了->componentDidMount
组件的 style 属性的设置方式也值得注意,不能写成
1 style = "opacity:{this.state.opacity};" ;
而要写成
style={ {opacity: this.state.opacity}}第一重大括号 表示这是 JavaScript 语法,第二重大括号 表示样式对象。
9.Ajax harmony 1 2 3 4 5 6 7 8 9 10 11 12 13 14 15 16 17 18 19 20 21 22 23 24 25 26 27 28 29 30 31 32 33 34 35 36 37 38 var UserGist = React.createClass({ getInitialState: function ( return { username: "" , lastGistUrl: "" , }; }, componentDidMount: function ( $.get( this .props.source, function (result ) var lastGist = result[0 ]; if (this .isMounted()) { this .setState({ username: lastGist.owner.login, lastGistUrl: lastGist.html_url, }); } }.bind(this ) ); }, render: function ( return ( <div> {this .state.username}'s last gist is <a href={this.state.lastGistUrl}>here</a>. </div> ); }, }); ReactDOM.render( <UserGist source="https://api.github.com/users/octocat/gists" />, document.body );
isMounted 只有组件还处于挂载状态下,才有 setState 从而更新视图的意义
10 嵌套组件 就是将一个组件放到另一个组件的 render 内
11 事件 如果要注册事件捕获处理程序,应该使用 Capture 事件,例如使用 onClickCapture 处理点击事件的捕获阶段,而不是 onClick。
新 API React 16.3 来了:带着全新的 Context API 聊一聊我对 React Context 的理解以及应用
12.常用方法 通过要寻找某个节点 Html
Js
1 ReactDOM.findDomNode(this .refs.tip);
获取节点的属性值 1 <ImgFigure data="nodeData" />
调用
1 <img src={this .props.data}>
更新状态 两个组件间互动 控制组件
1 <ImgFigure arrange={this .state.imgsArrangeArr[i]} />
被控组件
1 2 3 4 5 6 7 8 9 var styleObj = {}; if (this .props.arrange.pos) { styleObj = this .props.arrange.pos; } return ( <img style={styleObj}> )
参考文献:React React 是怎样炼成的
13 React-router -路由 1 2 3 4 history.pushState(null , path); history.replaceState(null , nextPath);
参考文献:React-router React-router
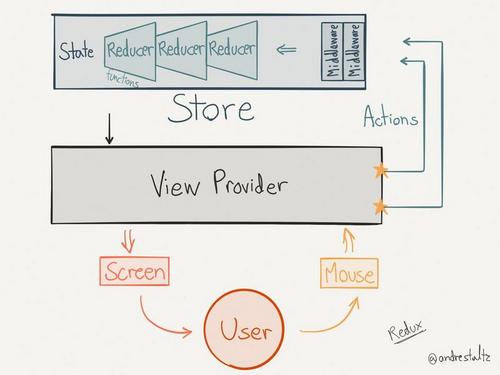
14 Redux -状态容器 安装 1 2 3 npm install --save redux npm install --save react-redux // React 绑定库 npm install --save-dev redux-devtools //开发者工具
关系展示
模型 1 2 3 4 5 6 7 8 9 10 11 12 13 14 15 16 17 18 19 20 21 22 const createStore = (reducer) => { let state; let listeners = []; const getState = () => state; const dispatch = (action) => { state = reducer(state, action); listeners.forEach(listener => listener()); }; const subscribe = (listener) => { listeners.push(listener); return () => { listeners = listeners.filter(l => l !== listener); } }; dispatch({}); return { getState, dispatch, subscribe }; };
例子 1 2 3 4 5 6 7 8 9 10 11 12 13 14 15 16 17 18 19 20 21 22 23 24 25 26 27 28 29 30 31 32 33 34 35 36 37 38 39 40 41 import { createStore } from 'redux'; /** * 这是一个 reducer,形式为 (state, action) => state 的纯函数。 * 描述了 action 如何把 state 转变成下一个 state。 * * state 的形式取决于你,可以是基本类型、数组、对象、 * 甚至是 Immutable.js 生成的数据结构。惟一的要点是 * 当 state 变化时需要返回全新的对象,而不是修改传入的参数。 * * 下面例子使用 `switch` 语句和字符串来做判断,但你可以写帮助类(helper) * 根据不同的约定(如方法映射)来判断,只要适用你的项目即可。 */ function counter(state = 0, action) { switch (action.type) { case 'INCREMENT': return state + 1; case 'DECREMENT': return state - 1; default: return state; } } // 创建 Redux store 来存放应用的状态。 // API 是 { subscribe, dispatch, getState }。 let store = createStore(counter); // 可以手动订阅更新,也可以事件绑定到视图层。 store.subscribe(() => console.log(store.getState()) ); // 改变内部 state 惟一方法是 dispatch 一个 action。 // action 可以被序列化,用日记记录和储存下来,后期还可以以回放的方式执行 store.dispatch({ type: 'INCREMENT' }); // 1 store.dispatch({ type: 'INCREMENT' }); // 2 store.dispatch({ type: 'DECREMENT' }); // 1
15 React-Redux 容器组件(Smart/Container Components)—用 Redux
1 2 3 4 5 6 7 8 9 10 11 12 13 14 15 16 17 import 'core-js/fn/object/assign'; import React from 'react'; import ReactDOM from 'react-dom'; import App from './components/Main'; import {createStore} from 'redux'; import {Provider} from 'react-redux'; import todoApp from 'stores/reducers.js'; export let store = createStore(todoApp); // Render the main component into the dom ReactDOM.render( <Provider store = {store}> <App /> </Provider>, document.getElementById('app') );
Main.js
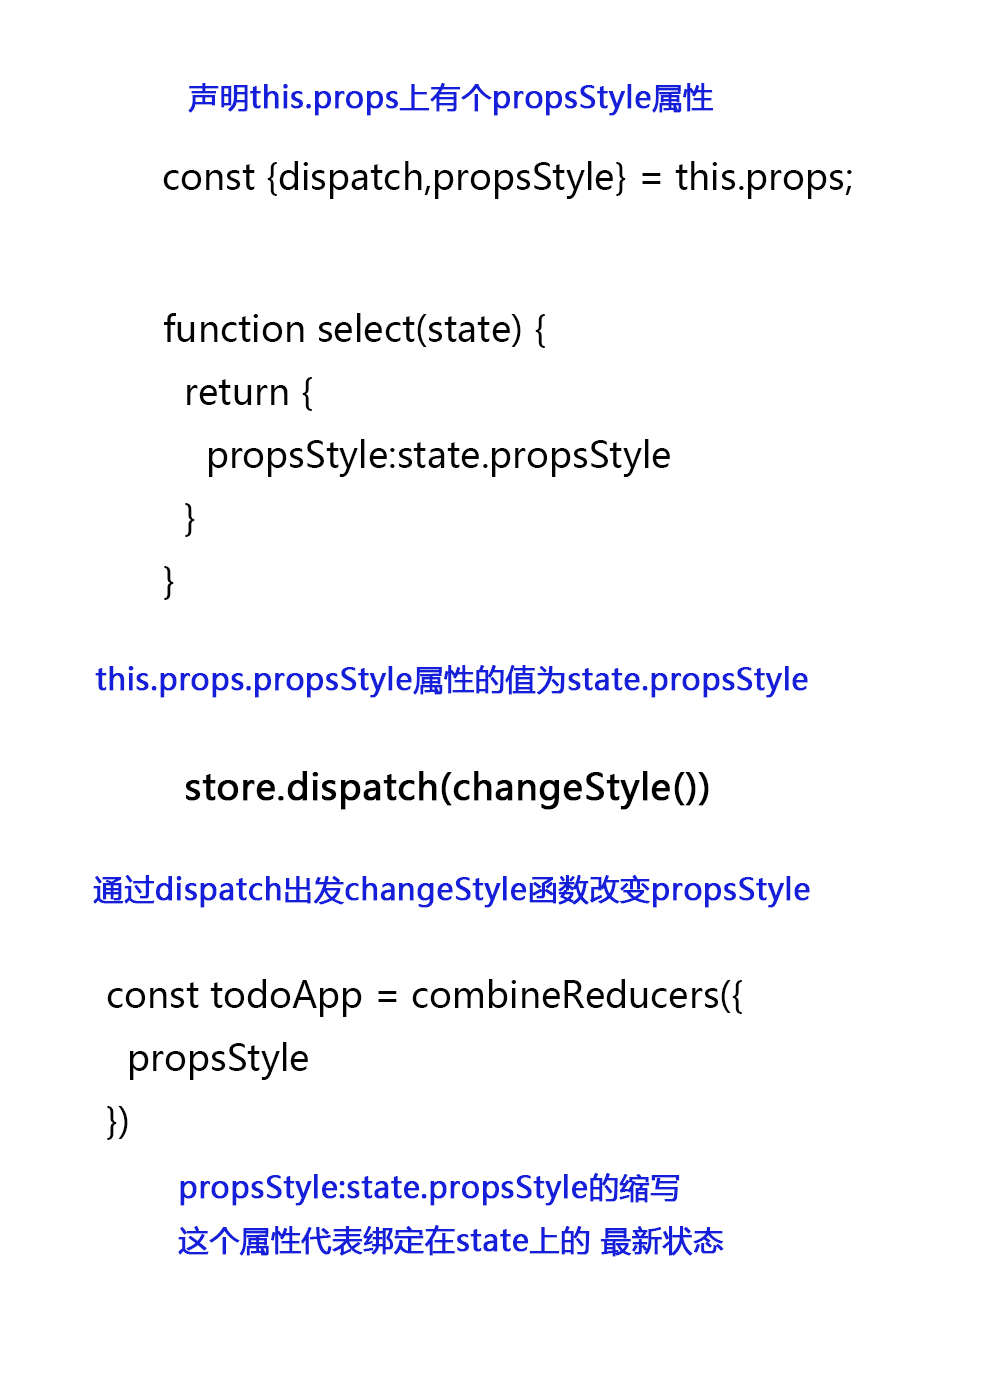
1 2 3 4 5 6 7 8 9 10 11 12 13 14 15 16 17 18 19 20 21 22 23 24 25 26 27 28 29 30 31 32 33 34 35 36 37 38 39 40 41 42 require('normalize.css/normalize.css'); require('styles/App.css'); import React from 'react'; import {connect} from 'react-redux'; import {store} from '../index' import {changeStyle} from '../actions/actions.js' import yeomanImage from '../images/yeoman.png' //let yeomanImage = require('../images/yeoman.png'); class AppComponent extends React.Component { constructor(props) { super(props); } handleClick(e){ store.dispatch(changeStyle()) //这个changeStyle是从actions引进的,action其实就是用来修改状态的 } render() { //从组件的props属性中导入actions里的方法和变量 const {dispatch,propsStyle} = this.props; return ( <div className="index"> <img src={yeomanImage} alt="Yeoman Generator" /> {propsStyle} <div onClick={this.handleClick.bind(this)}>Please edi to get started!</div> </div> ); } } function select(state) { return { //将我们需要的state中的数据绑定到props上 propsStyle:state.propsStyle } } export default connect(select)(AppComponent); //export default AppComponent;
actions.js
1 2 3 4 5 6 7 export const change = 'change'; export function changeStyle(text) { return {type:change, text:text } }
reducers.js
1 2 3 4 5 6 7 8 9 10 11 12 13 14 15 16 import {combineReducers} from 'redux'; import {change} from '../actions/actions.js' function propsStyle(state=0,action) { switch (action.type){ case change: return state +1 default: //必须有 return state } } const todoApp = combineReducers({ propsStyle //这个属性名propsStyle必须和函数propsStyle同名 表示通过这个函数处理后的state的值为state.propsStyle connect会将state.propsStyle赋值到props }) export default todoApp;
参考文献:解读 redux 工作原理 Redux 史上最全的 Redux 源码分析
Mobx mobx——rudex 的简单替代品 ;awesome-mobx
注意+优质代码 1.将 this 遍历绑定到方法上 harmony 1 2 3 4 5 6 7 8 9 10 11 class A extends React .Component constructor () { super (...arguments); for (let i in this ) { const method = this [i]; if (method instanceof Function ) { this [i] = this [i].bind(this ); } } } }
其他方法参考
Next 中文教程 渲染子组件的几种方法
通过 Next 搭建集 Next+React+Koa+Mongo 的脚手架 1.先启动 mongo Ant Design Pro 001-ant design pro 页面加载原理及过程,@connect 装饰器
单向数据流 reducer– 合并所有,并且挂载到prop上,会有独立的namespace
dispatch(action名字)
其中Vuex中有mapState, mapGetters, mapActions, mapMutations方法
vuex里mapState,mapGetters使用详解